The brilliant video footage produced by the divers of the August 2000 diving expedition – see Chapters 2.3.4/2.3.5 of this Update – made it possible for the first time to analyse in detail the damage on both front bulkheads of the vessel and subsequently reconstruct, in combination with the very detailed photo documentation of the visor and the now available detailed statements of some of the key witnesses among the survivors, the actual movement of the visor, after its locking and hinges had broken. It is therefore now assumed by this Group of Experts that in all probability an initial very abrupt upwards movement was triggered off by one or more powerful explosions behind the lower part of the starboard front bulkhead and inside and/or below the visor bottom, i.e. underwater because the void space below B-deck behind the starboard front bulkhead and the visor probably up or even above the 2nd stringer level were full of water. This is known to increase the power of any explosive up to 10 times. See also Chapter 18.
This initial and very abrupt upwards and – subsequently - downwards movement of the visor is now assumed to have taken place in three phases explained below, assisted by a total of nine drawings, which are numbered and to which reference is made as follows.
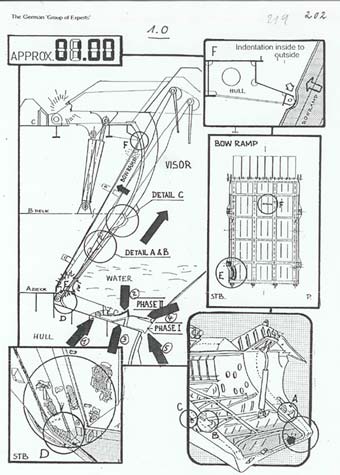
The first drawing after this page – numbered 1.0 – shows a side view of the visor and foreship. Five arrows point to areas of interest which are explained as follows: |